.webp)

Google Analytics 4, also known as GA4, is the current standard for tracking how people interact with your website. If you run a business website, portfolio, or lead-generation site, GA4 helps you understand what visitors do, where they come from, and how they move through your pages. This guide focuses on one clear goal: helping you set up GA4 correctly with Google Tag Manager (GTM), step by step and without unnecessary complexity.
There are several ways to install GA4. Some people add the tracking code directly to their website. Others use built-in integrations offered by different platforms. In this guide, we focus only on Google Tag Manager, because this is the cleanest, most flexible, and most reliable way we have found to manage analytics over time.
If you want GA4 installed once and future-proofed for updates, events, and additional tracking, this approach is for you.
Before You Start: Accounts and Access
Before you touch any settings or copy any tracking codes, it’s important to slow down for a moment. This part is not technical, but it’s critical. Many GA4 setups fail not because of code, but because of wrong accounts, wrong access, or wrong ownership from the very beginning. If you get this step right, everything that follows becomes easier, cleaner, and less stressful for you.
Think of this phase as preparing the ground before building a house. You would not start construction without knowing who owns the land and who has the keys. GA4 works the same way.
Use the Right Google Account From Day One
The first thing you should think about is which Google account you are using. This sounds simple, but it causes more problems than almost anything else.
If you are setting up GA4 for your own business, use a Google account that belongs to the business. Avoid using a personal Gmail account if possible. This keeps things clean and avoids issues later when teams grow or responsibilities change.
If you are setting this up for a client, this rule becomes even more important. You should always use a dedicated Google account that you use for client work. This keeps your personal data separate and makes access management much easier over time.
Most importantly, the GA4 property must live inside the client’s own Google Analytics account. You should never create a client’s GA4 property under your personal account. The client must own their data. You are there to help, not to control access.
Make Sure You Have Proper Admin Access
Before you move forward, confirm that you have the right level of access. Viewer or Editor access is often not enough for a proper GA4 setup.
You should have Admin access in:
· Google Analytics
Admin access allows you to create properties, manage data streams, configure events, and define conversions. Without it, you will constantly hit roadblocks and waste time asking for permissions later.
If you are working with a client, ask for access early. Explain clearly why Admin access is required. Most clients are happy to grant it when they understand that it keeps their data safe and properly configured.
A good habit is to double-check access before starting any setup work. It saves you from stopping halfway through the process.
Understand Account, Property, and Access Roles
GA4 uses a structure that can feel confusing at first, especially if you are new to it. Taking a few minutes to understand this structure will help you avoid mistakes.
At a high level:
· The Account is the top-level container
· The Property is where data is collected
· Users are added with specific roles
You will usually work at the Property level, but ownership and permissions are controlled at the Account level. This is why setting things up under the correct account matters so much.
When you add users, think carefully about their role. Not everyone needs full Admin access. Some team members may only need to view reports. Others may need to edit events or conversions.
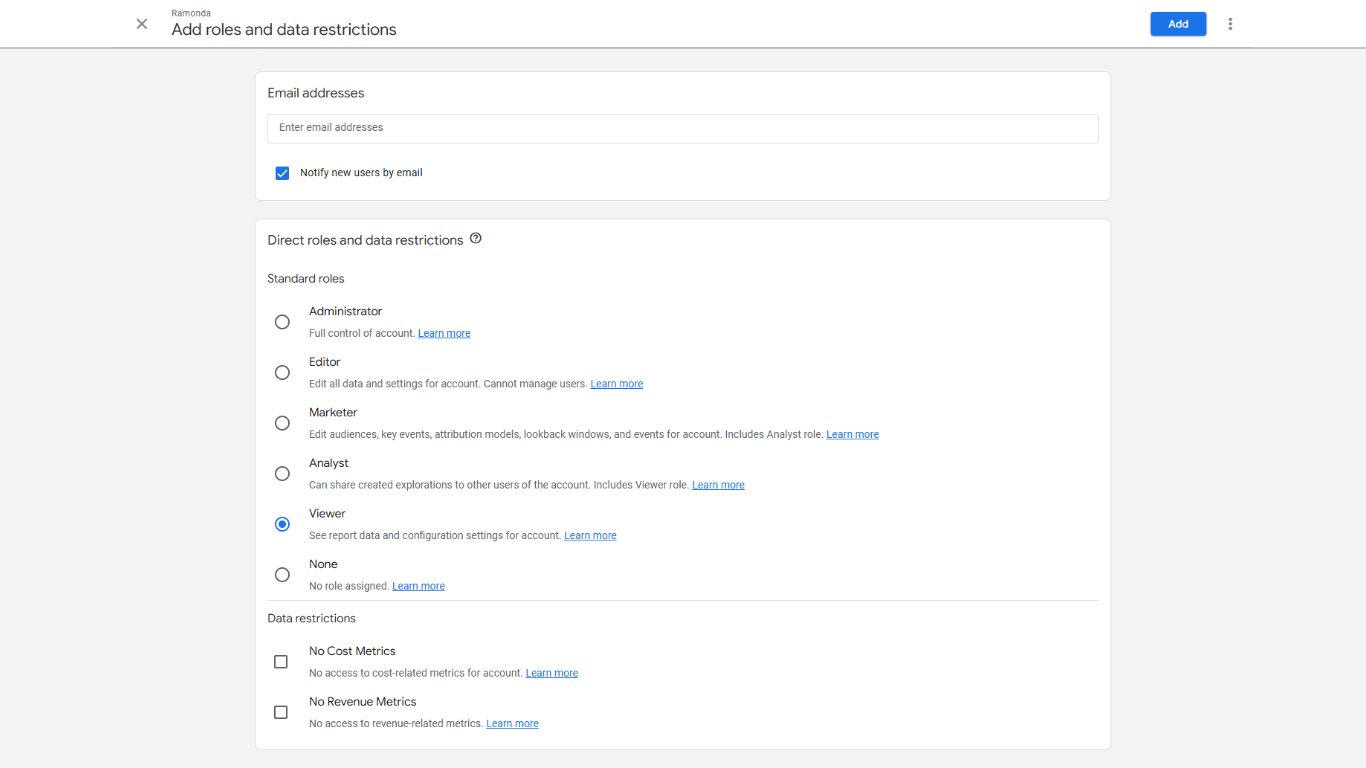
Clear roles reduce confusion and prevent accidental changes that could break tracking.
Decide Who Should Have Access Long Term
Before moving on, it’s worth thinking ahead. Who should have access to GA4 six months from now or one year from now?
For a small business, this might be just one or two people. For a growing company, it could include marketing, product, or leadership teams.
For client projects, agree early on who owns what. The client should always have full access. You should have the access needed to do your job. Anyone else should be added only if there is a clear reason.
This approach keeps the account clean and avoids the situation where too many people are clicking around without knowing what they are changing.
Why This Step Saves You Time Later
It’s tempting to rush into the setup and start adding tags right away. But spending a bit of time on accounts and access saves you hours later.
When ownership is clear, and access is correct:
· You avoid data loss
· You avoid permission errors
· You avoid awkward conversations later
· You build trust with clients or teammates
Most importantly, you create a setup that can grow. GA4 is not something you configure once and forget. You will revisit it, improve it, and rely on it for decisions. Starting with the right structure makes all of that easier.
Once accounts and access are in place, you are ready to move forward with confidence. The technical steps will feel much smoother because the foundation is solid.
Create and Connect GA4
Now that your accounts and access are sorted, it’s time for the actual setup work. This is the part most people are eager to jump into, and for good reason.
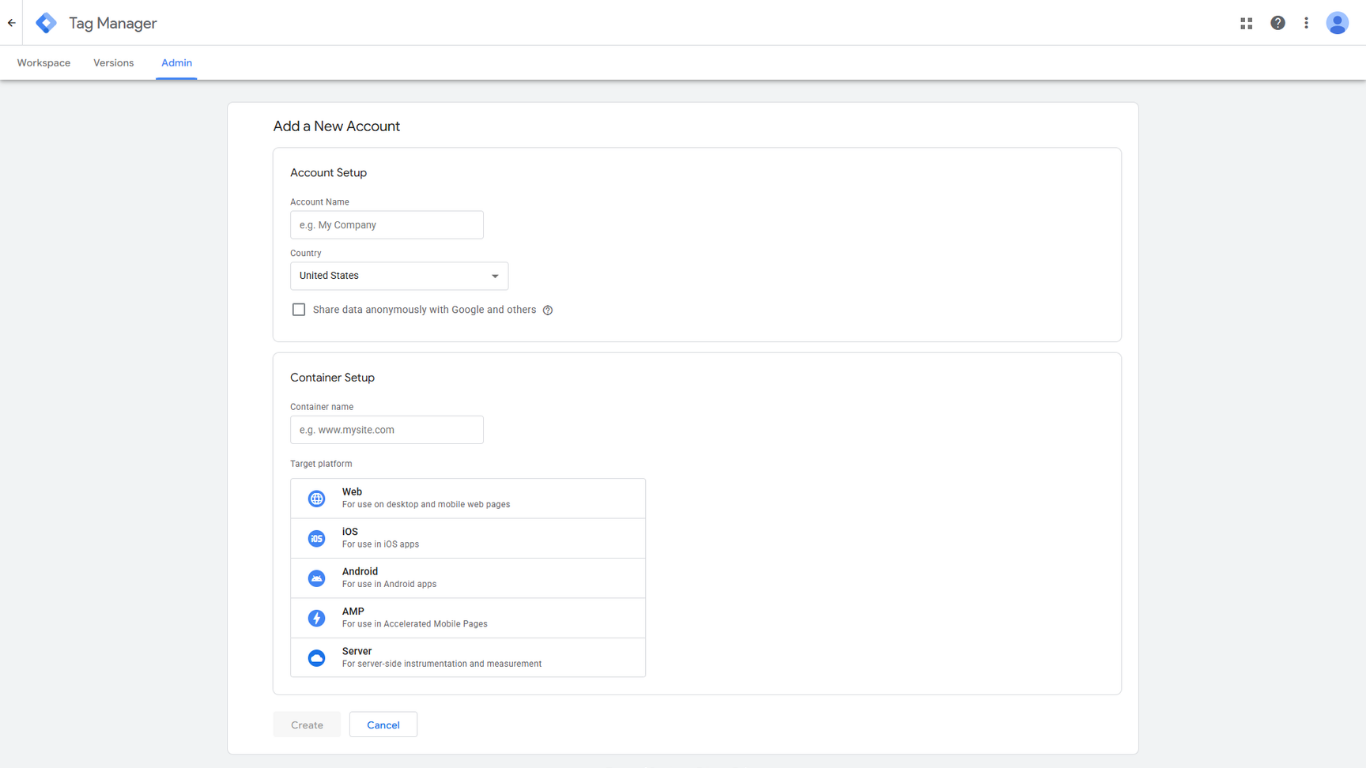
Even if you have a Google account ready, you haven't actually created the Analytics container yet. Your very first move is to click the Start measuring button. This is the "on" switch for your data collection journey.
Once you click that button, you’ll be brought to the Account creation screen. Think of the "Account" as the top-level folder for your brand.
· Account Name: This should usually be your or your client's Brand Name. It keeps things organized, especially if you plan to manage multiple websites later.
· Data Sharing Settings: You’ll see several checkboxes regarding Google products, services, and technical support. As a rule of thumb, check all boxes to ensure you are receiving the most comprehensive data and insights Google can offer.
.webp)
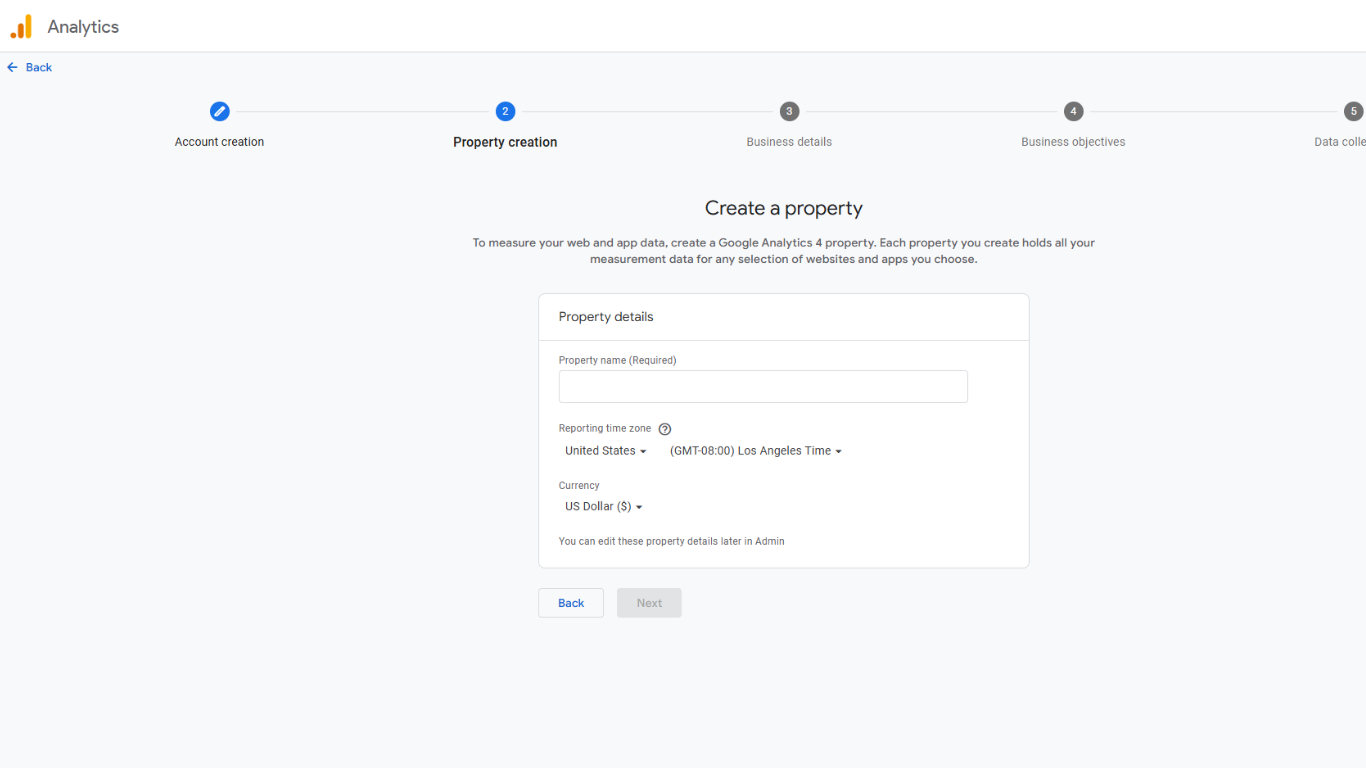
Your next step is creating a GA4 property. This property is where all your website data will live, so it’s important to get it right.
When you create a new GA4 property, you’re asked to choose basic settings like property name, time zone, and currency. These choices affect how your data is reported later, so take a moment to double-check them. For example, choosing the wrong time zone can make daily reports confusing and harder to trust.
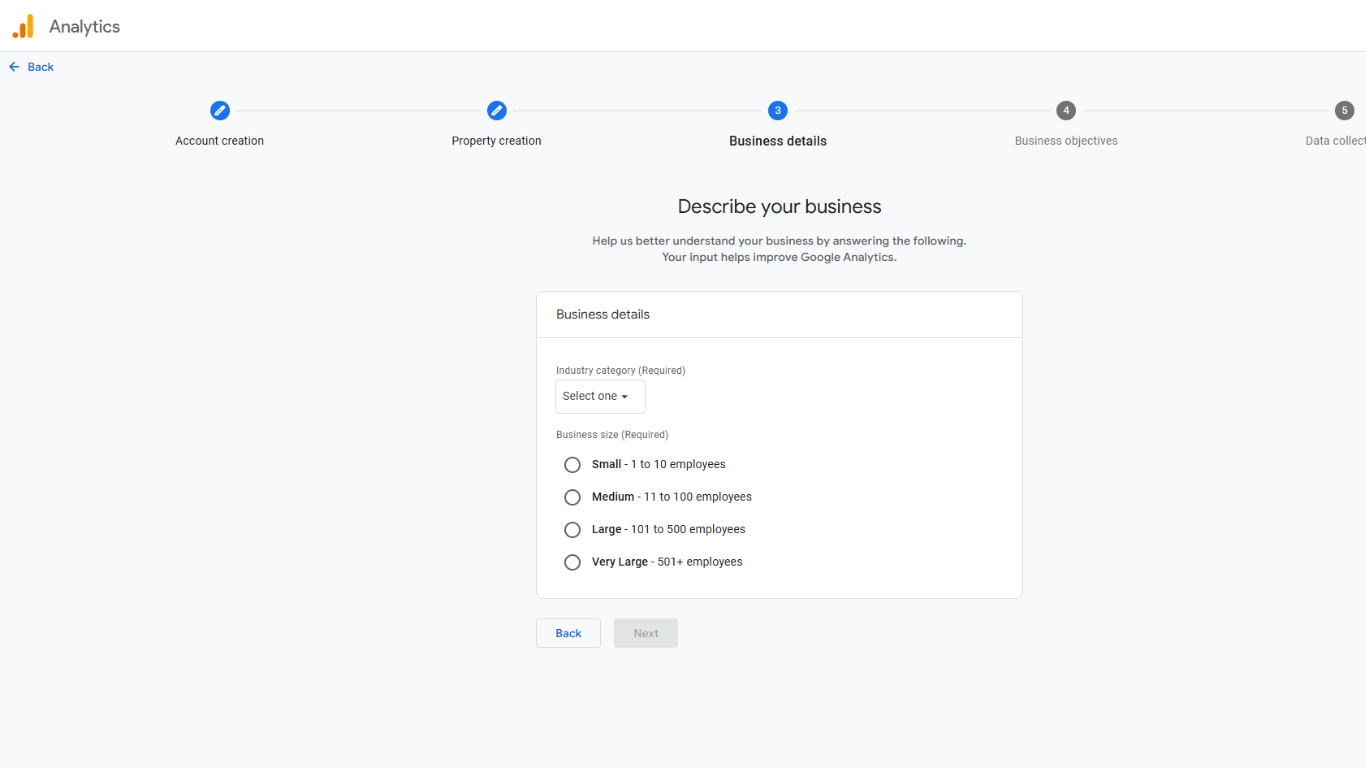
Google also needs to understand your context through the Business details screen, you are required to select the category that best fits your trade or profession, and to choose your organization's scale, ranging from Small (1-10 employees) to Very Large (501+ employees).
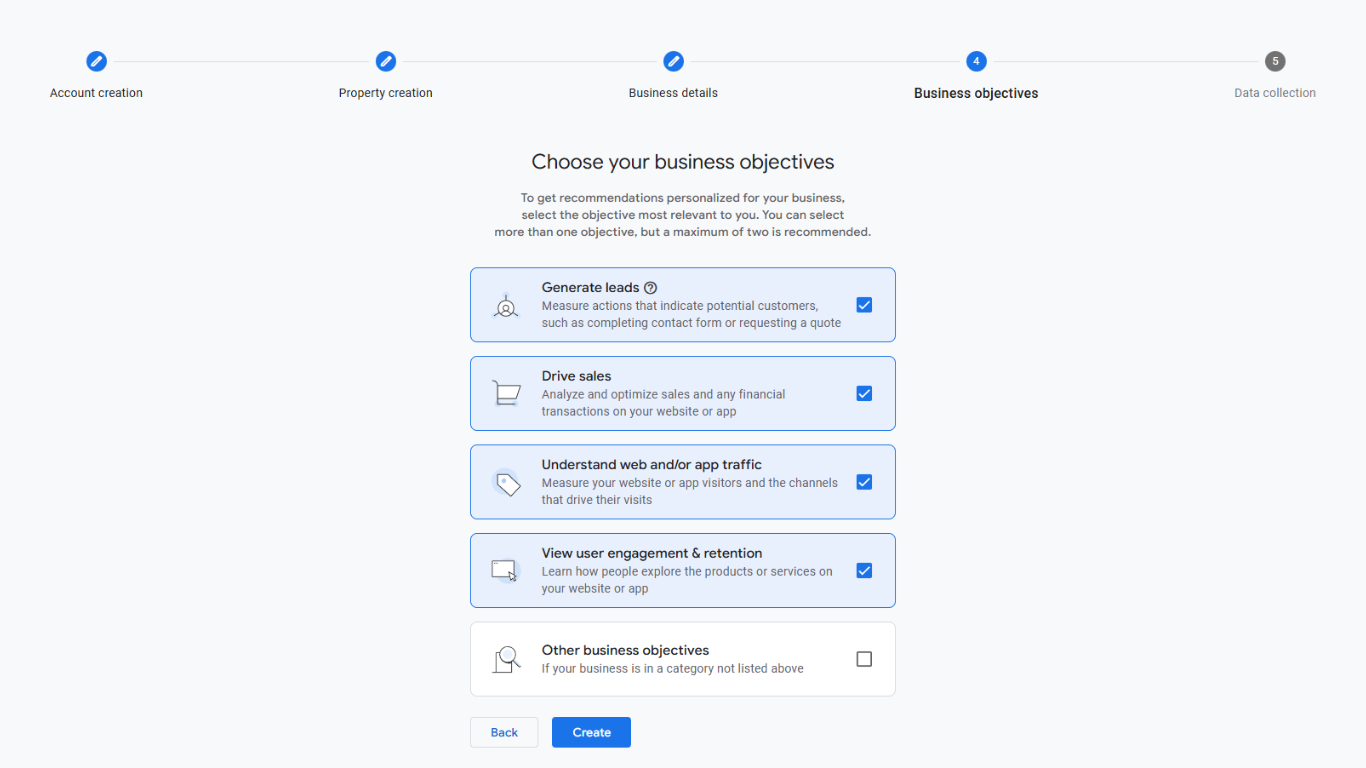
Next, you will define what you actually want to achieve. Google uses these Business objectives to personalize the recommendations and reports you see later. You can select specific goals such as Generate leads, Drive sales, Understand web and/or app traffic, or View user engagement & retention. In most cases, you should select them all.
Next, you'll arrive at the Data collection step. This is where you tell Google where your traffic is actually coming from. You will be prompted to choose a platform. Since we are focusing on your site, you will click on the Web option to begin the stream configuration.

After the property is created, you’ll set up a web data stream. This is how GA4 knows which website it should track. You’ll enter your website URL and give the stream a clear name, usually your site or brand name.
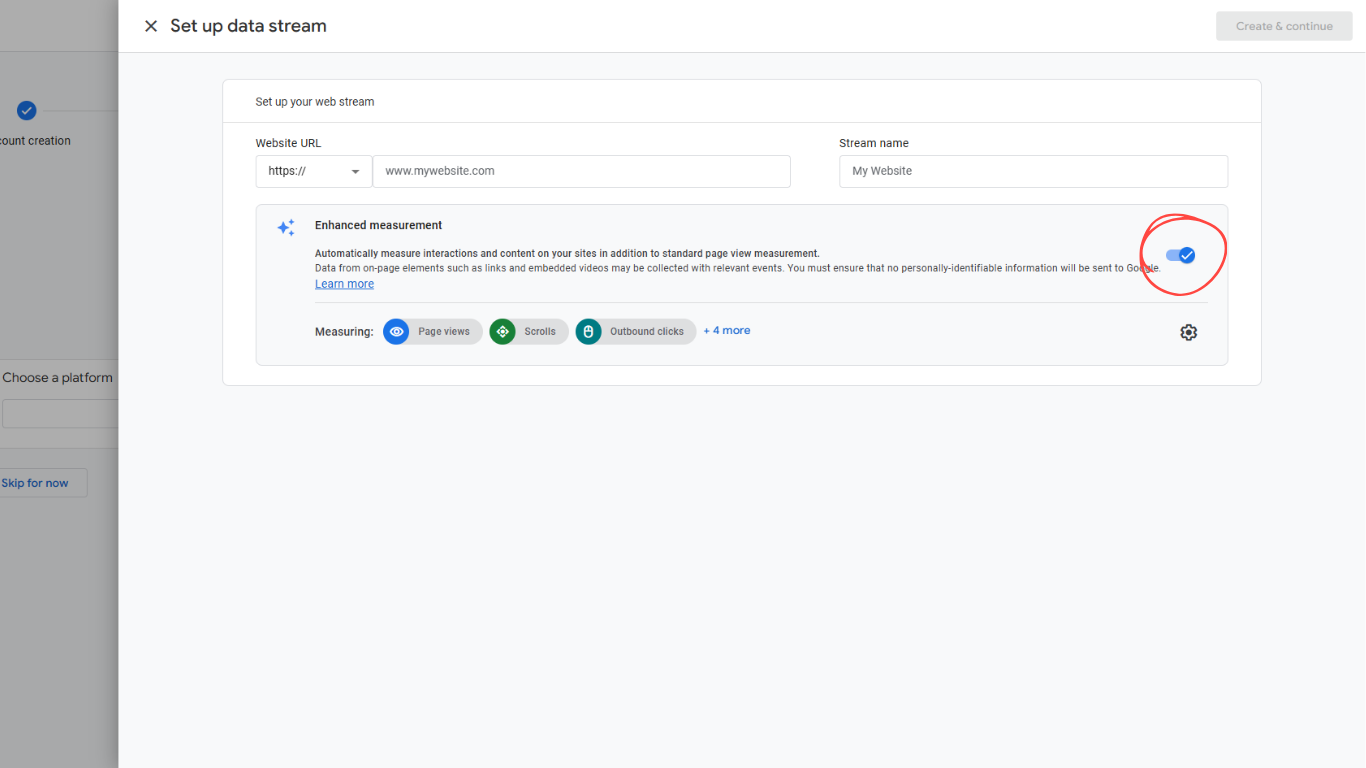
Make sure enhanced measurement is enabled. This allows GA4 to automatically track things like page views, scrolls, outbound clicks, and file downloads. It’s a great starting point and saves you extra work later.
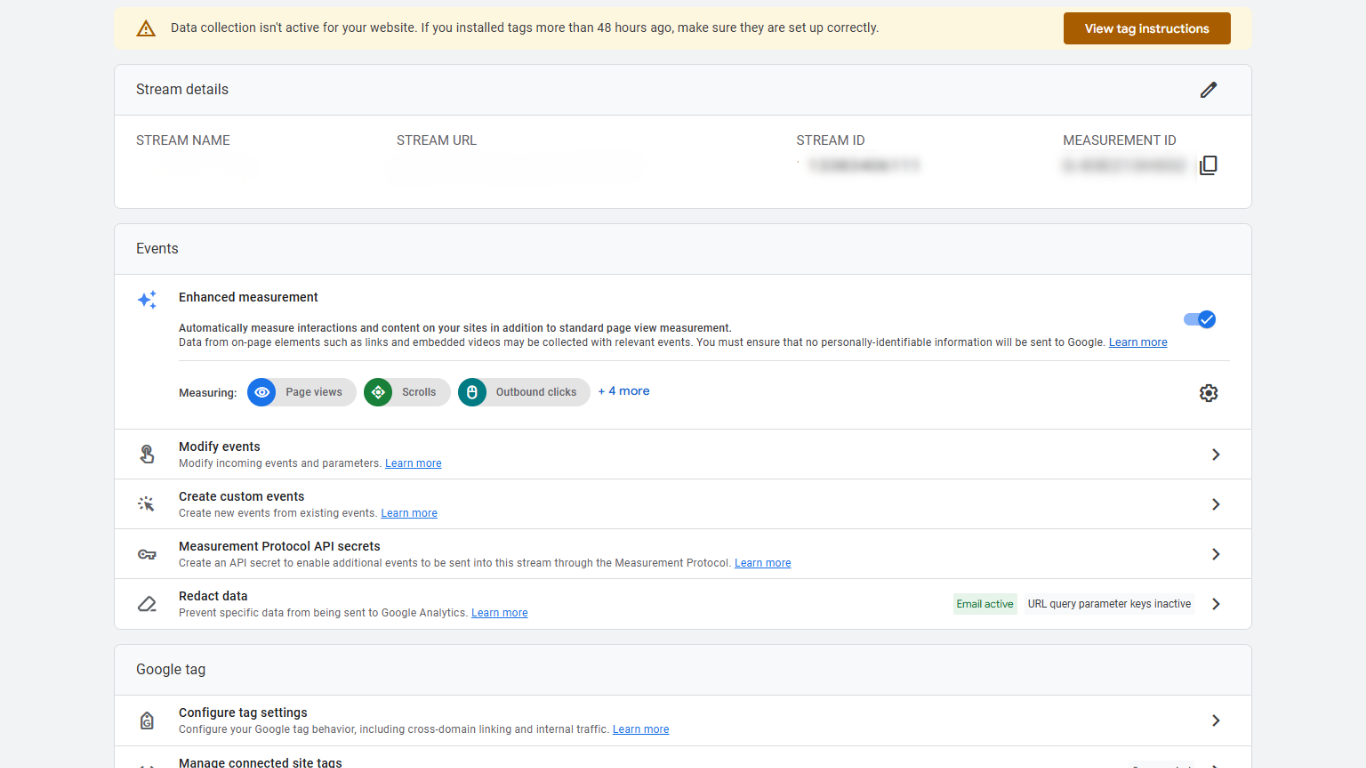
Once the stream is created, GA4 gives you a Measurement ID. This ID is important. Think of it as the address GA4 uses to know where to send data. You don’t add this directly to your website. You’ll use it inside Google Tag Manager instead.
Set Up Google Tag Manager Before Connecting Anything
Before GA4 can receive data, Google Tag Manager needs to be in place. Google Tag Manager acts as the middle layer between your website and Google Analytics. It handles when and how the tracking code runs.
If a Tag Manager account already exists for the website, make sure you have access. If not, create a new one using the website or business name.
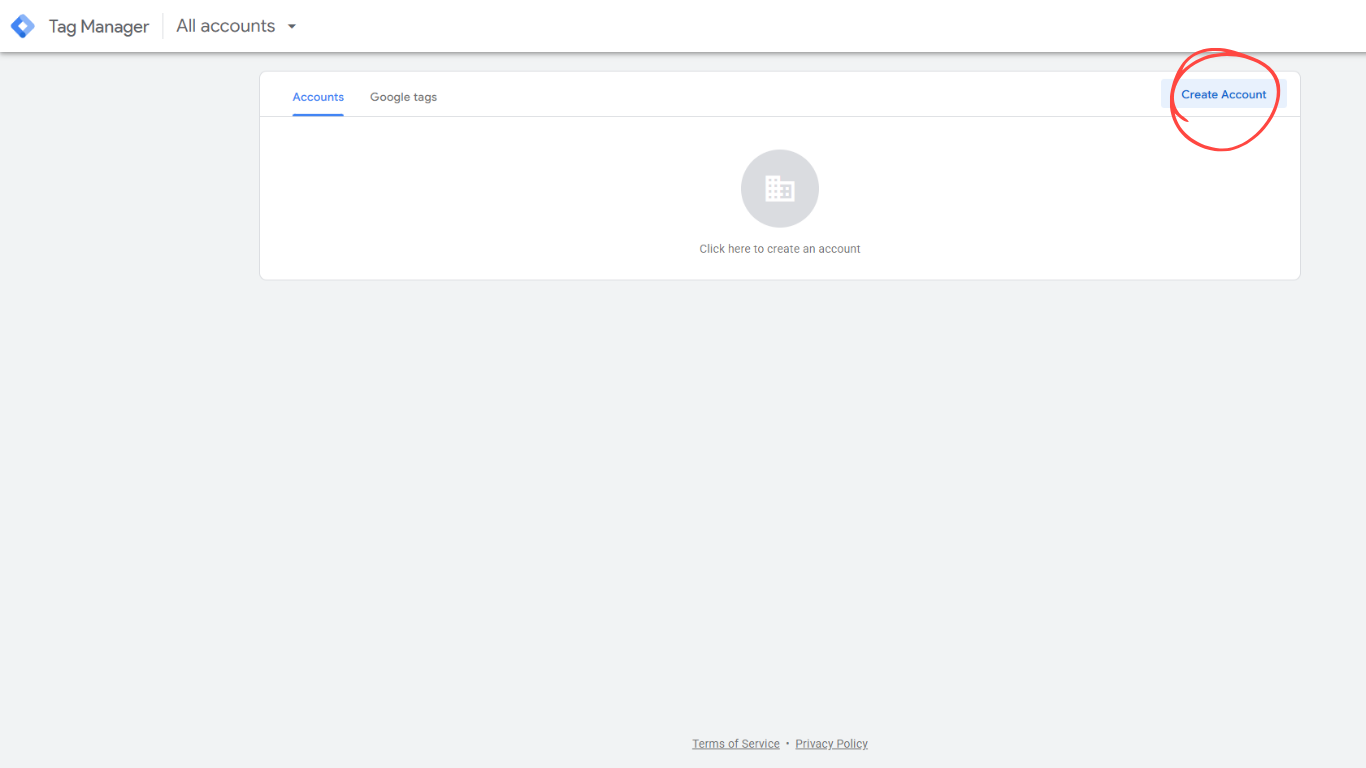
Inside that account, you’ll create a container. The container represents the website itself.
After the container is created, Google Tag Manager gives you two code snippets. These snippets need to be added to your website so GTM can load properly.
One snippet goes into the head section of your website. The other goes right after the opening body tag. Once this is done, publish your website. Until you publish, Google Tag Manager will not work.
At this stage, nothing is being tracked yet. Google Tag Manager is installed, but it’s empty. That’s exactly what you want before connecting GA4.
Connect GA4 Inside Google Tag Manager
This is where everything comes together.
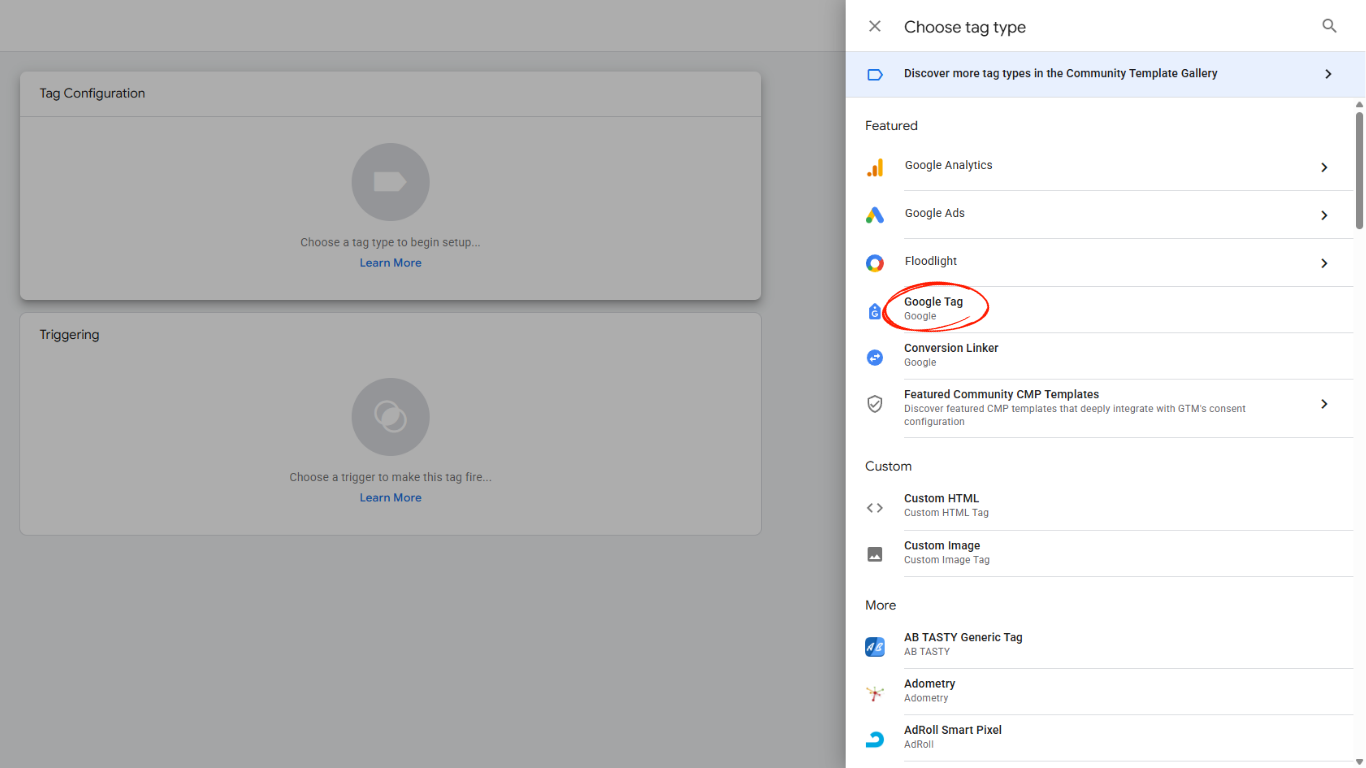
Open your Google Tag Manager container and go to the Tags section.
Create a new tag,
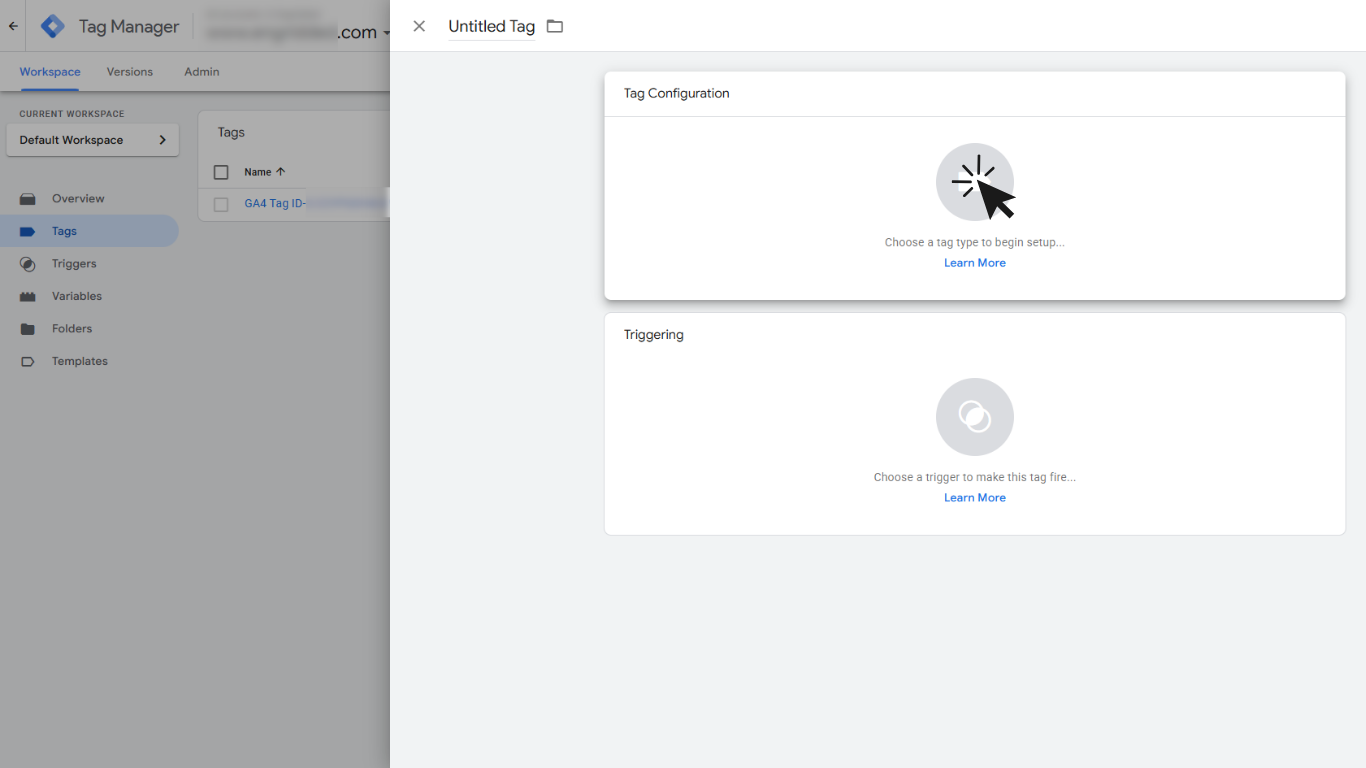
and in Tag Configuration choose Google Tag. This tag tells Google Tag Manager how to communicate with Google Analytics.
Paste your Measurement ID into the tag settings. This connects the tag to your GA4 property.
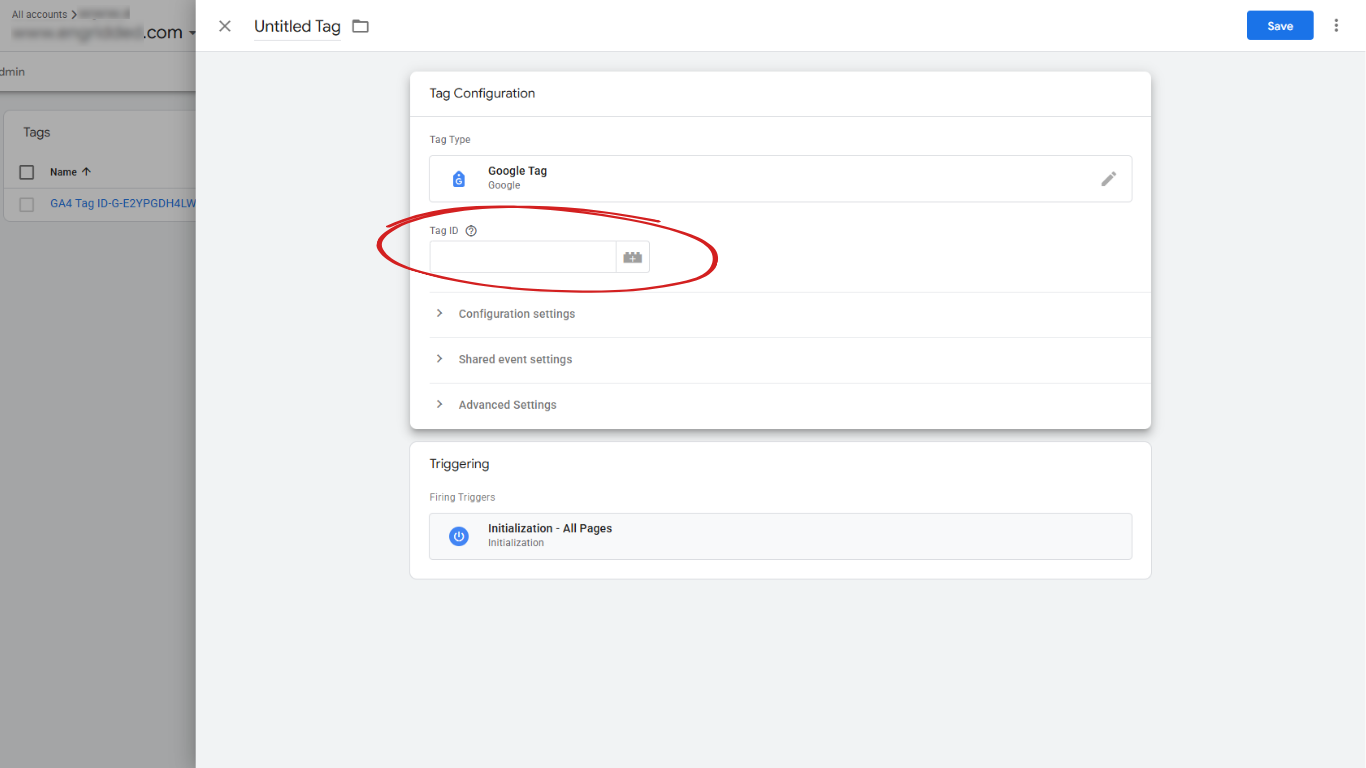
Next, choose a trigger. For a basic setup, use the All Pages trigger. This ensures GA4 loads on every page of your website, which is what you want for accurate tracking.
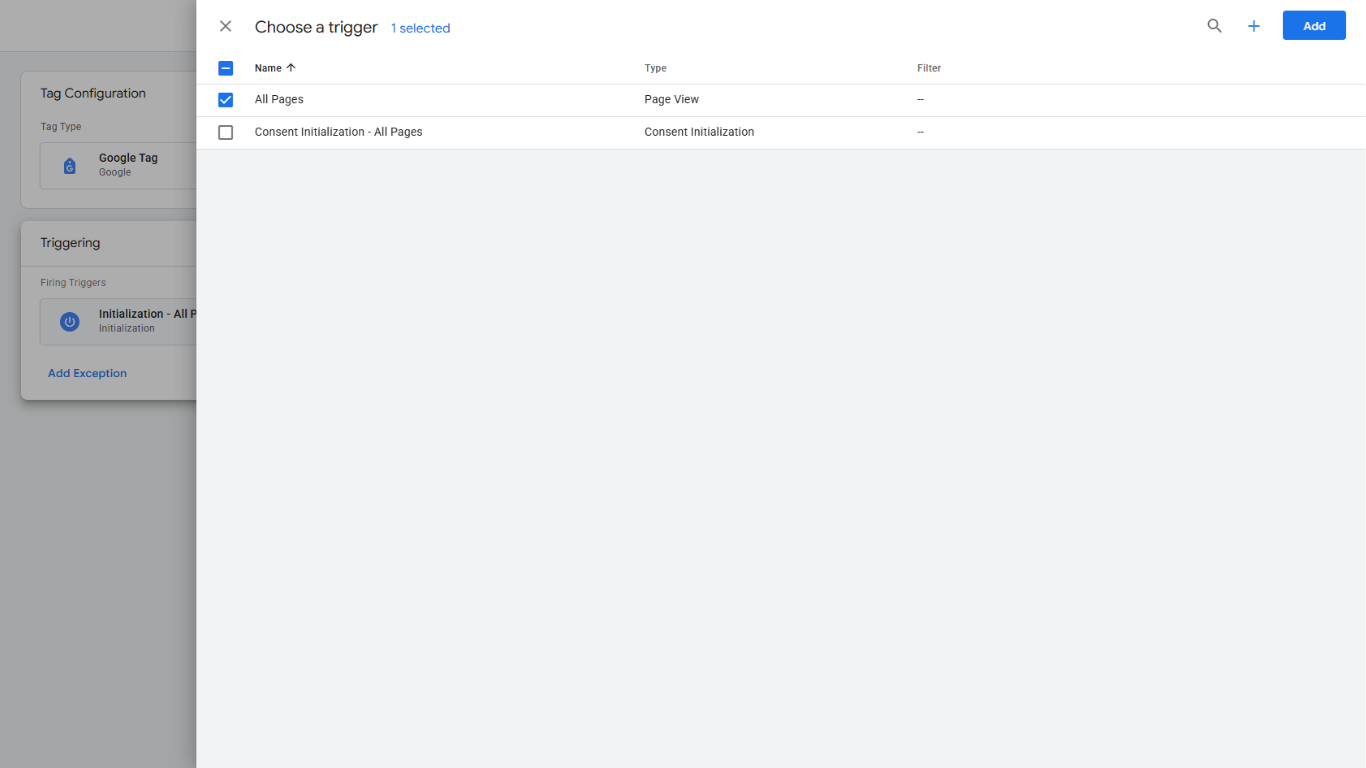
Give the tag a clear name, something like "GA4 Tag ID… and your code". Clear naming makes your setup easier to understand later, especially if more tags are added.
Save the tag, but remember, saving is not enough. Until you publish the container, the tag does nothing.
Publish and Make the Connection Live
Once your GA4 tag is created, publish your Google Tag Manager container. Publishing makes the configuration live on your website.
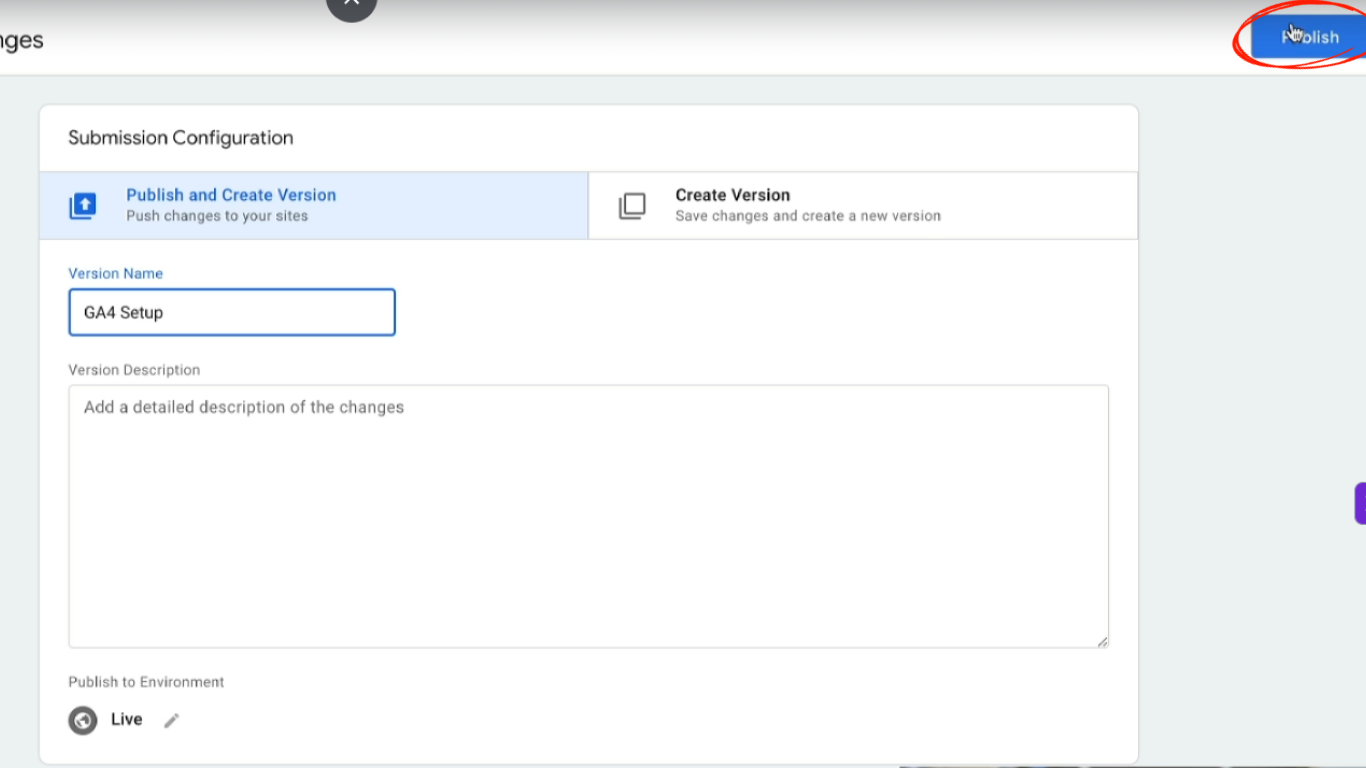
This step is often forgotten, and it’s one of the most common reasons GA4 appears broken. If you don’t publish, GA4 will never receive data.
After publishing, your website is officially connected to GA4 through Google Tag Manager. From this moment on, GA4 can start collecting data.
Check That the Connection Actually Works
Never assume the setup works just because you followed the steps. Always test.
Open your website in a new browser tab. Then open Google Analytics 4 and look at the realtime report. You should see at least one active user, which is you.
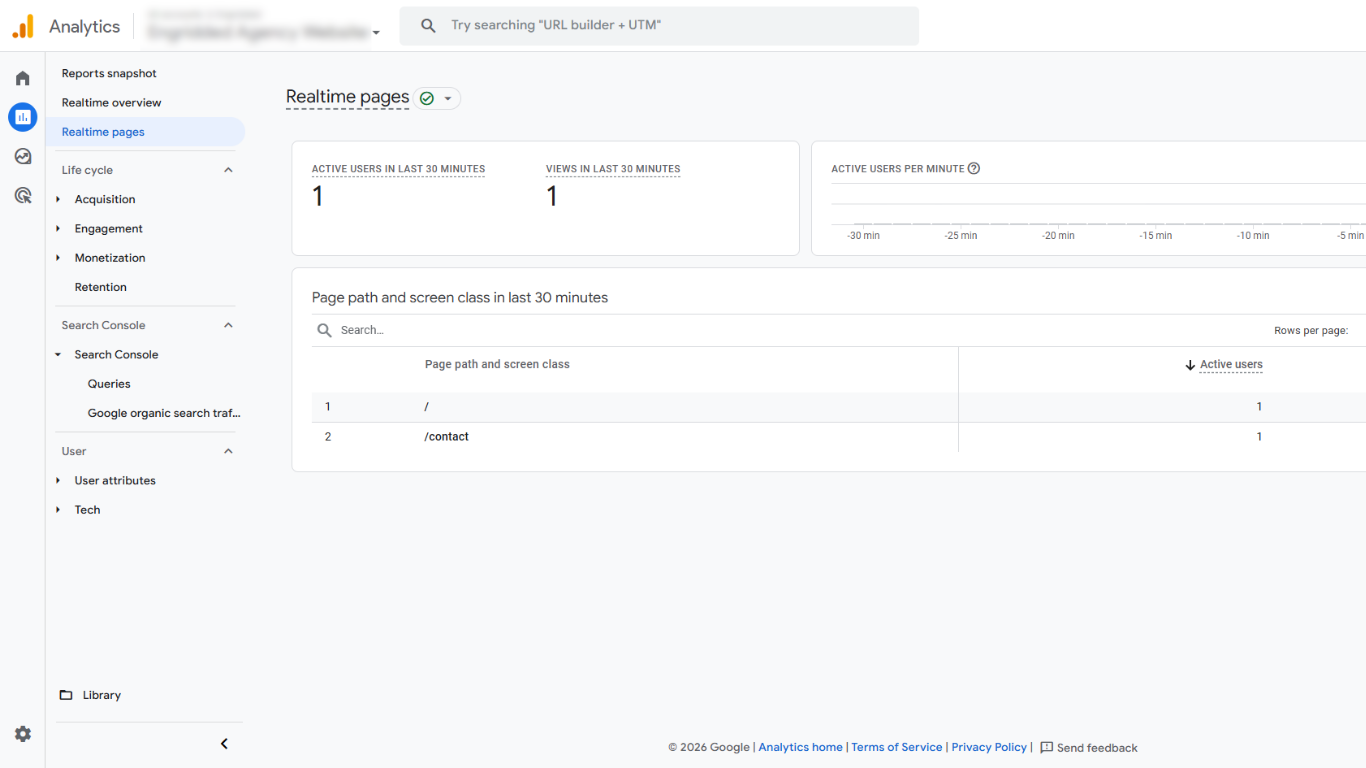
Click around your site, open different pages, and watch events appear. This confirms that GA4 is receiving data correctly.
If you don’t see anything, don’t panic. Check a few common issues:
· Was the website published after adding GTM
· Was the GTM container published
· Is the Measurement ID correct
· Is GA4 installed only once
Fixing these early saves you from bad data later.
With GA4 now live and collecting data, the next step is understanding how people find your website.
Connect Search Console
Once GA4 is up and running, you already have a solid view of how people behave on your website. But there is still one big piece missing. You know what users do after they arrive, but you don’t yet know how they found you. That’s where Search Console comes in.
Connecting Google Search Console with GA4 gives you visibility into organic search performance. You see which search queries bring users to your site, which pages appear in search results, and how search traffic behaves once it lands on your website. When both tools work together, your data finally tells a complete story.
What Search Console Actually Adds to GA4
GA4 focuses on user behavior after the visit starts. Search Console focuses on visibility before the visit happens. When you connect them, you bridge that gap.
With Search Console connected, you can:
· See organic search queries inside GA4
· Understand which landing pages perform best in search
· Compare search traffic behavior with other channels
· Spot opportunities to improve content and structure
Without this connection, organic search becomes a blind spot. You see traffic numbers, but you do not see intent.
How to Connect Search Console to GA4
Before connecting anything, confirm that Search Console is already set up for your website. This step is often skipped or assumed.
Once Search Console is ready, connecting it to GA4 takes only a few minutes.
Follow these steps:
· Open Google Analytics 4
· Click Admin in the bottom-left corner
· Scroll down until you see Search Console links
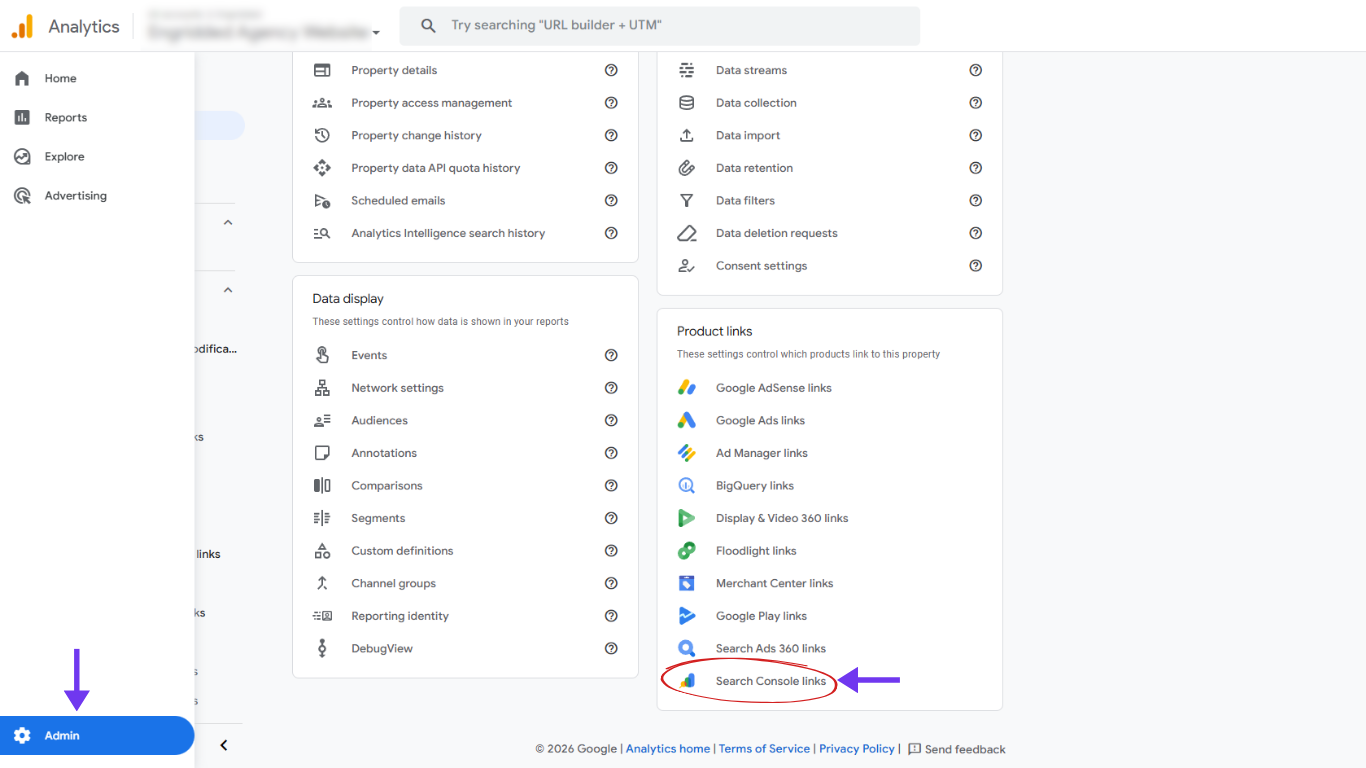
· Click on Link

· Click on Choose accounts
· Click on Add a property
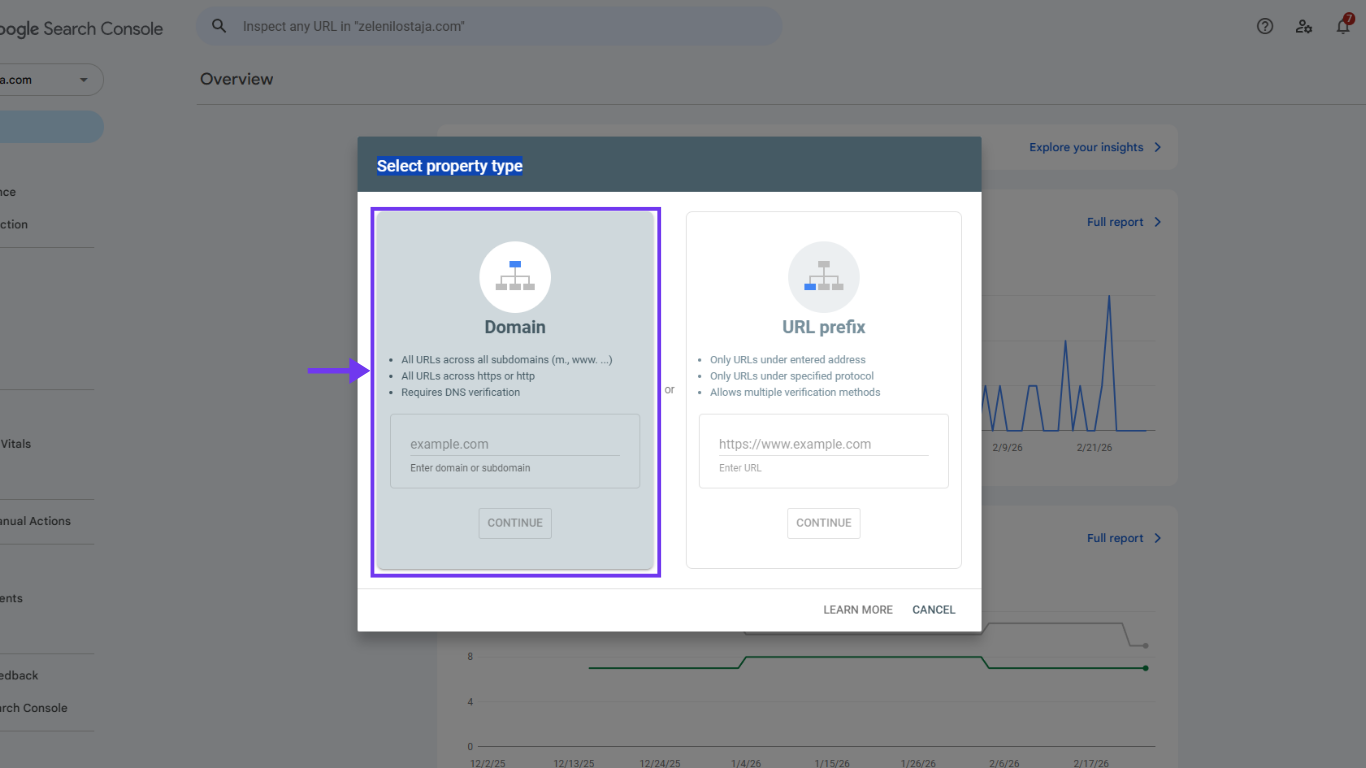
· Verify your domain
If the site is not verified, GA4 cannot access search data. Verification proves ownership and protects your data.
It’s also important that the same Google account has access to both GA4 and Search Console. If access is missing, the connection option will not appear.
Next, get back to Google Analytics 4 and choose:
· The correct Search Console property
· The correct GA4 web data stream
Confirm the selection and complete the linking process.
That’s it. The connection is now active.
Keep in mind that data does not appear instantly. Search Console data usually starts showing inside GA4 within one to two days.
Where to Find Search Console Data in GA4
After the connection is complete, you can access Search Console reports inside GA4.
You will find them under:
· Reports
· Search Console
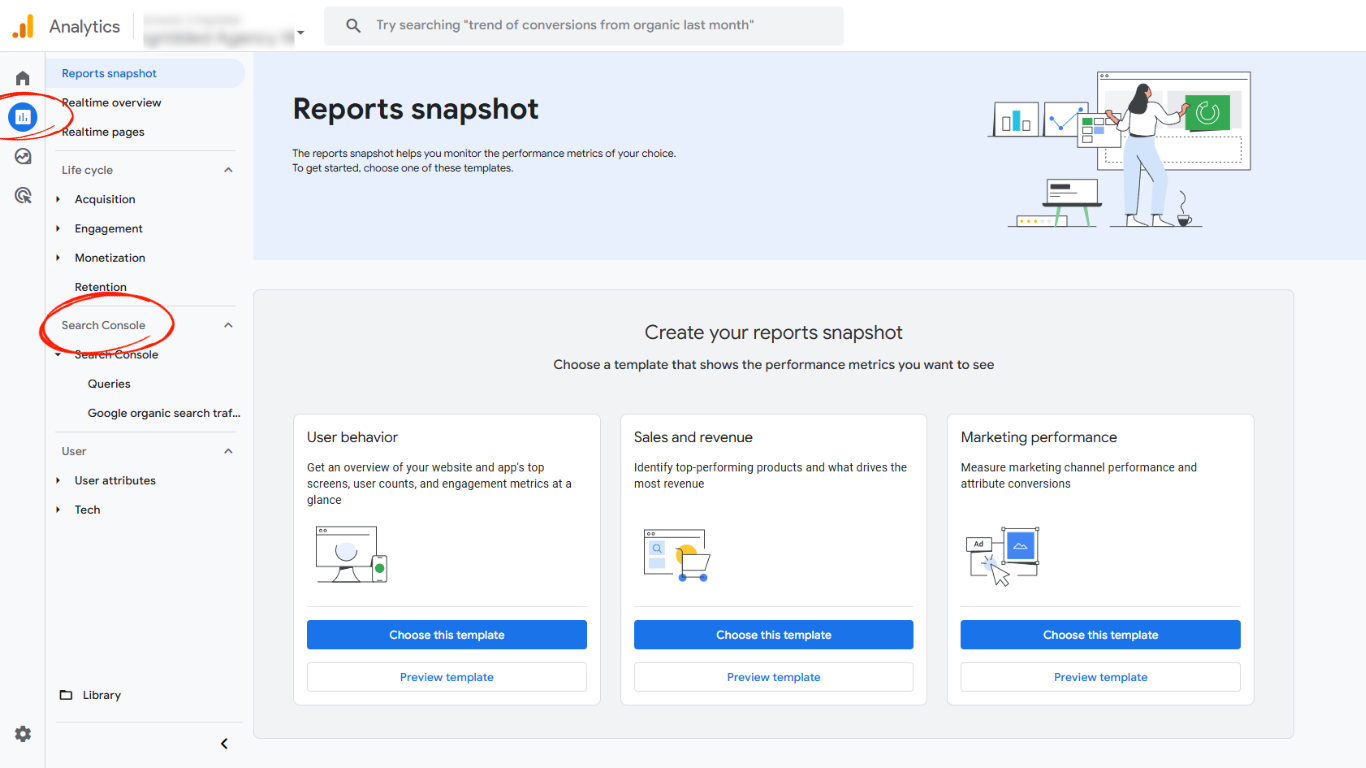
Here, GA4 shows two main views:
· Search queries
· Google organic search landing pages
These reports help you understand not just traffic volume, but relevance. You see which pages attract attention and which queries match your content.
How to Use This Data in a Practical Way
It’s easy to look at Search Console data and feel overwhelmed. The key is knowing what to focus on.
Start by asking simple questions:
· Which pages get impressions but few clicks
· Which queries bring engaged users
· Which pages attract traffic but have high bounce or low engagement
This combination of visibility and behavior is powerful. It helps you improve content based on real user intent, not assumptions.
Instead of guessing what people want, you see exactly how they search and how they react.
Now that traffic sources are connected, it’s time to clean the data before relying on reports.
Internal Traffic Filter
Once GA4 is connected and collecting data, the next thing you should do is clean it up. One of the biggest sources of bad data comes from you and your team. Every time you visit your own website, you create noise. That noise makes reports unreliable and decisions harder.
The internal traffic filter exists to solve exactly this problem. It removes visits from people who already know the site too well. That way, GA4 focuses only on real users, real behavior, and real opportunities.
Why Internal Traffic Is a Bigger Problem Than You Think
It’s easy to underestimate how much internal traffic affects your data. You might think, “It’s just a few visits.” In reality, it adds up fast.
Think about how often you:
· Open the homepage
· Refresh pages while checking content
· Test forms or buttons
· Review layouts or changes
All of these actions count as sessions, page views, and events. GA4 does not know it’s you unless you tell it.
If your website does not get massive traffic yet, internal visits can completely distort:
· Engagement rate
· Conversion rate
· Top pages
· User flow
That leads to wrong conclusions. You might optimize the wrong pages or think something works when it does not.
What the Internal Traffic Filter Actually Does
The internal traffic filter tells GA4 to ignore visits from specific IP addresses. These are usually:
· Your office IP
· Your home IP
· Your agency IP
· Known testing environments
Once configured correctly, GA4 still collects the data, but it marks it as internal. Then you can choose to exclude it from reports.
This is important. GA4 does not delete the data. It separates it. That gives you control and flexibility later.
Step One: Identify Your Internal IP Address
Before setting up the filter, you need to know which IP addresses belong to your team.
You can:
· Search “What is my IP” in your browser
· Ask your IT provider for your office IP
· Use a range if your network changes often
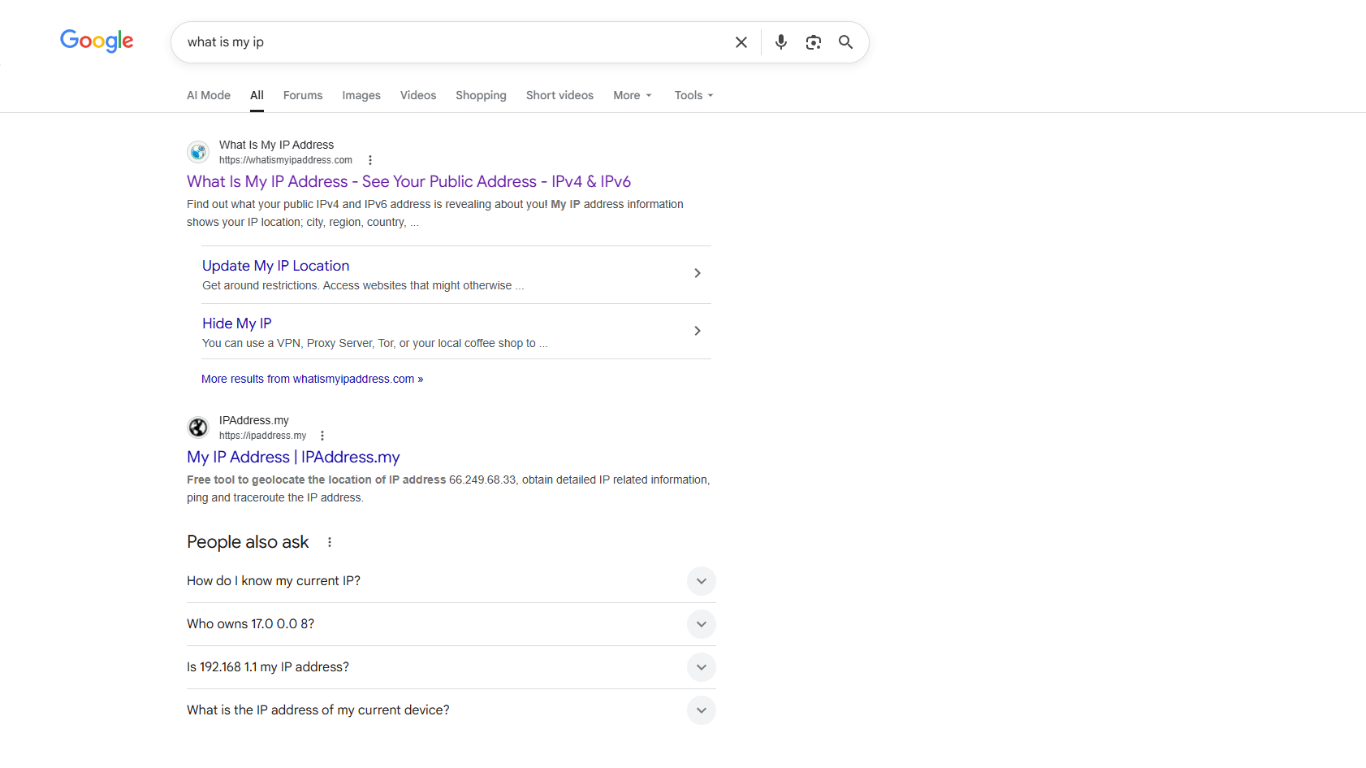
If you work remotely, start with your main IP first. You can always add more later.
Step Two: Define Internal Traffic in GA4
Now you tell GA4 what counts as internal traffic.
Do the following:
· Open Google Analytics 4
· Click Admin
· Go to Data Streams
· Select your web data stream
· Open Configure tag settings
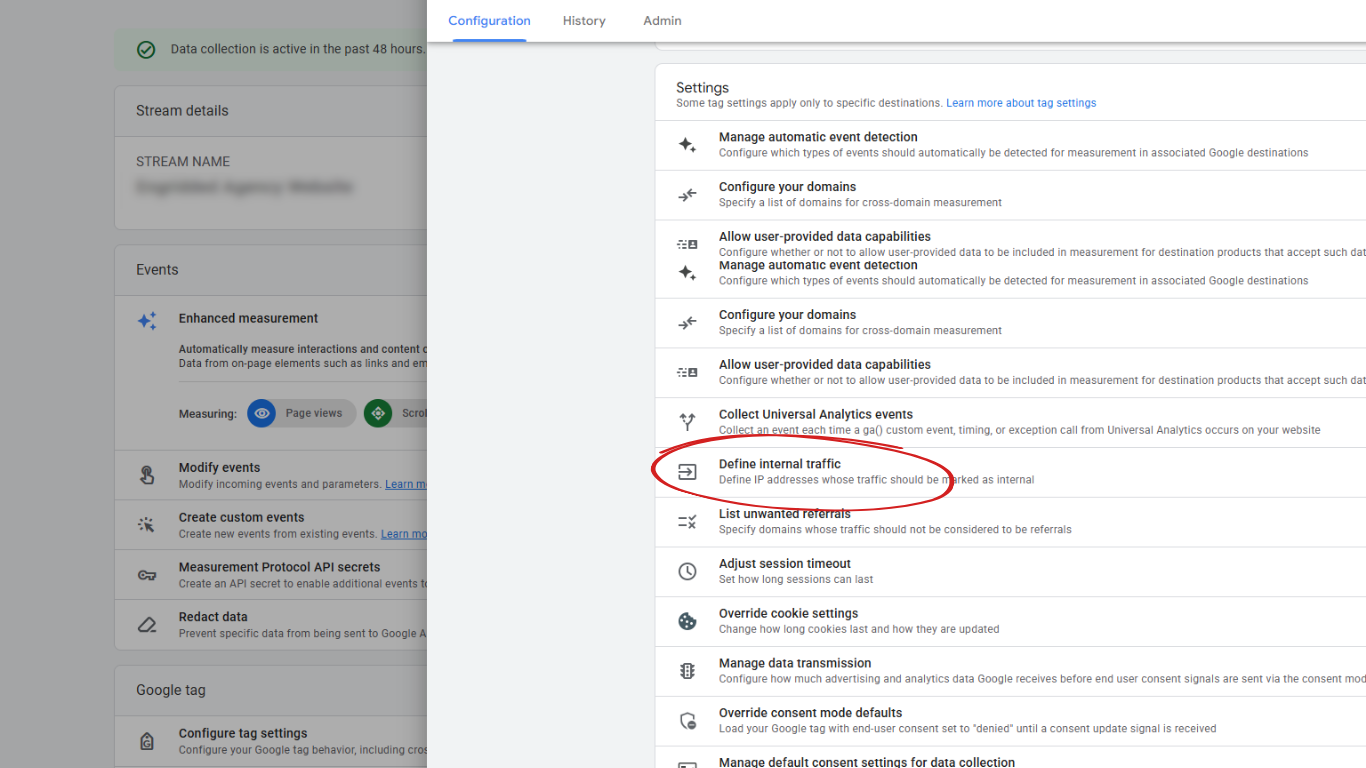
· Click Define internal traffic
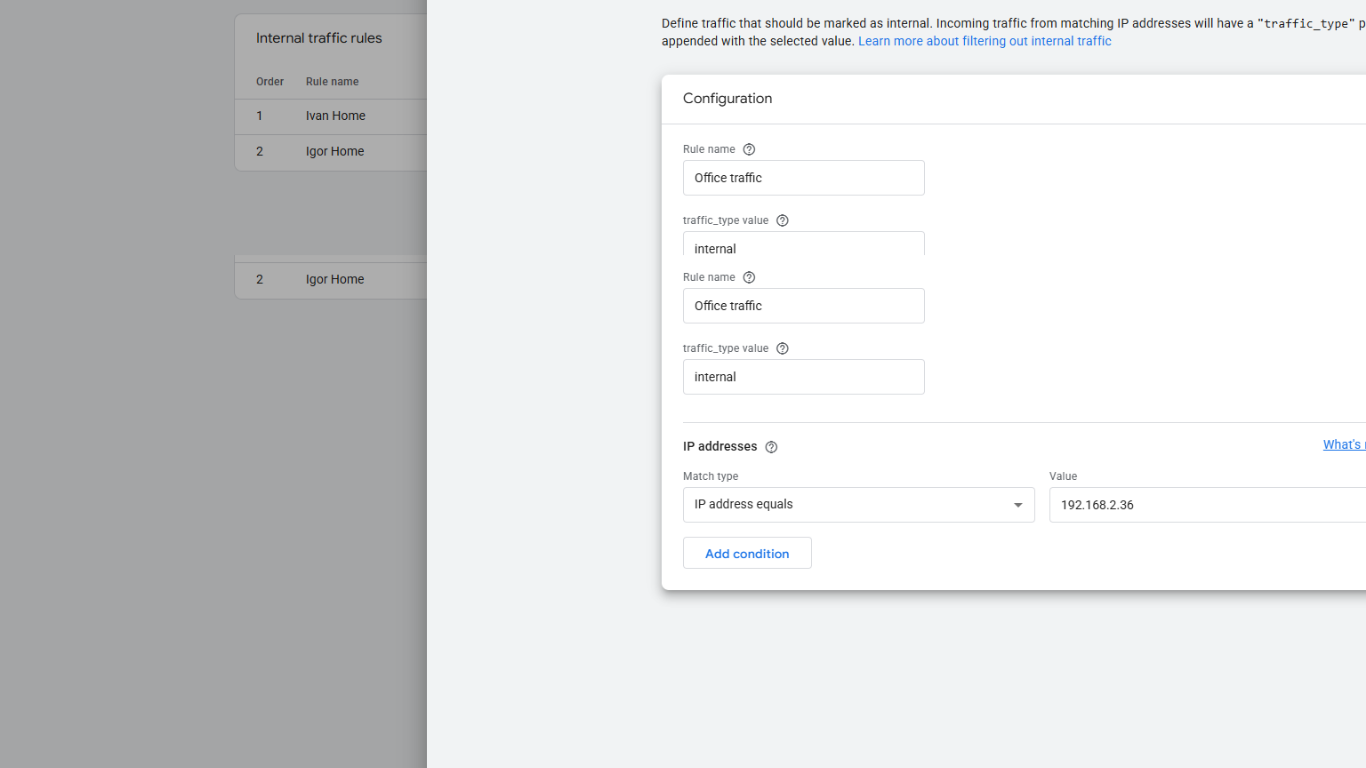
Create a new rule:
· Rule name, for example “Office traffic”
· Traffic type value, usually “internal”
· IP matching type, most often “IP address equals”
· Enter your IP address
Save the rule.
At this stage, GA4 knows what internal traffic looks like.
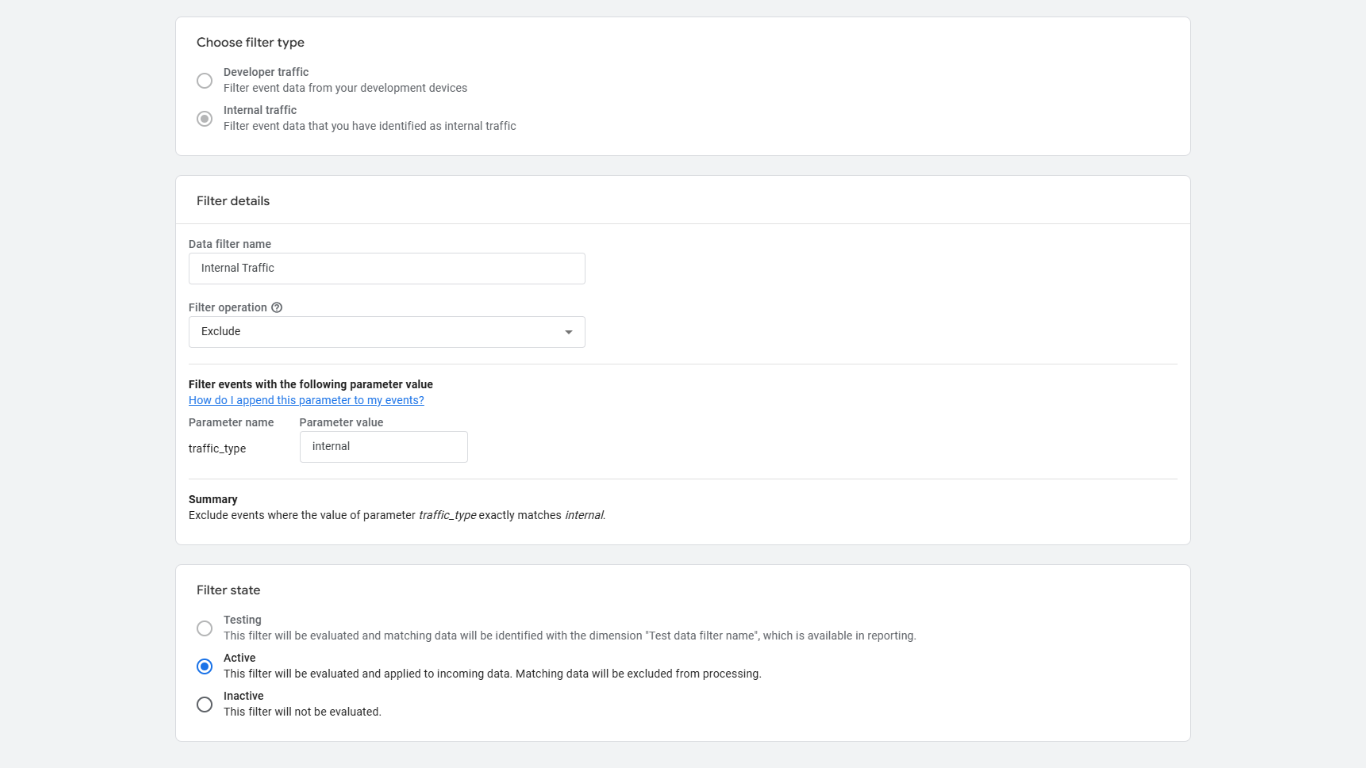
Step Three: Activate the Internal Traffic Filter
Defining internal traffic is not enough. You must activate the filter.
Do this next:
· Go back to Admin
· In Property Settings
· Under Data collection and modification
· Click Data Filters
· Find Internal Traffic
You will see three Filter state options:
· Testing
· Active
· Inactive
Start with Testing if you want to double-check behavior.
Once you are confident, switch it to Active.
When active, internal traffic is excluded from standard reports.
How to Test That the Filter Works
Testing is simple and worth the time.
After enabling the filter:
· Visit your website from the internal IP
· Open Realtime in GA4
· Check if your session appears
If you do not see yourself, the filter works.
If you still appear, double-check the IP and filter status.
Never assume it works without testing.
Common Mistakes With Internal Traffic Filters
Many setups fail because of small mistakes.
Watch out for these:
· Forgetting to activate the filter
· Using the wrong IP address
· Filtering too broadly
· Forgetting remote team members
Another common issue is filtering too early. Always confirm GA4 is working before excluding traffic. Otherwise, debugging becomes harder.
When You Should Revisit This Setup
Internal traffic filtering is not a one-time task.
You should revisit it when:
· Your team grows
· You move offices
· You work from new locations
· You add a new agency or partner
Keeping this list updated keeps your data trustworthy.
Why This Step Makes GA4 More Useful
Filtering internal traffic does not make GA4 more complex. It makes it more honest.
Once internal visits are gone:
· Engagement metrics stabilize
· Conversion rates make more sense
· Reports reflect real users
· Decisions feel more confident
This is one of the simplest changes with the biggest impact.
After this step, your GA4 setup is no longer just installed. It’s clean. And clean data is the foundation for everything you do next.
With clean data in place, the final step is making sure GA4 tells you when something important changes.
Alerts
Once GA4 is set up and your data is clean, there is one more feature that can quietly save you a lot of time and stress. Alerts. Alerts turn GA4 from something you check occasionally into something that watches your website for you. Instead of logging in every day to see if something changed, GA4 can tell you when it matters.
Alerts are especially useful because most problems do not announce themselves. Traffic drops, conversions slow down, or something breaks quietly. Alerts help you catch these moments early, before they turn into bigger issues.
What Alerts Really Do Inside GA4
Alerts in GA4 are designed to notify you when something significant changes in your data. They are not about daily noise. They focus on unusual behavior.
For example, alerts can notify you when:
· Traffic suddenly drops
· Traffic suddenly spikes
· Conversions decrease
· Revenue changes unexpectedly
· Engagement patterns shift
Instead of guessing whether something is wrong, you get a clear signal. That signal gives you a reason to investigate.
Alerts do not fix problems for you. They simply make sure you notice them in time.
Why Alerts Matter More Than Constant Checking
Many people open GA4 too often. They refresh reports without knowing what they are looking for. This leads to confusion and second-guessing.
Alerts change that behavior.
When alerts are set up correctly:
· You stop checking GA4 randomly
· You focus only when something changes
· You save time
· You make calmer decisions
Think of alerts as a smoke detector. You do not stare at it all day. You trust it to warn you when something is wrong.
Types of Alerts You Should Care About
Not all alerts are equally useful. The goal is not to track everything. The goal is to track what matters.
Good alert examples include:
· A sudden drop in sessions
· A drop in conversions
· A sharp spike in traffic
· A change in purchase or lead volume
Avoid alerts for tiny fluctuations. Websites naturally go up and down. Alerts should focus on meaningful changes, not normal variation.
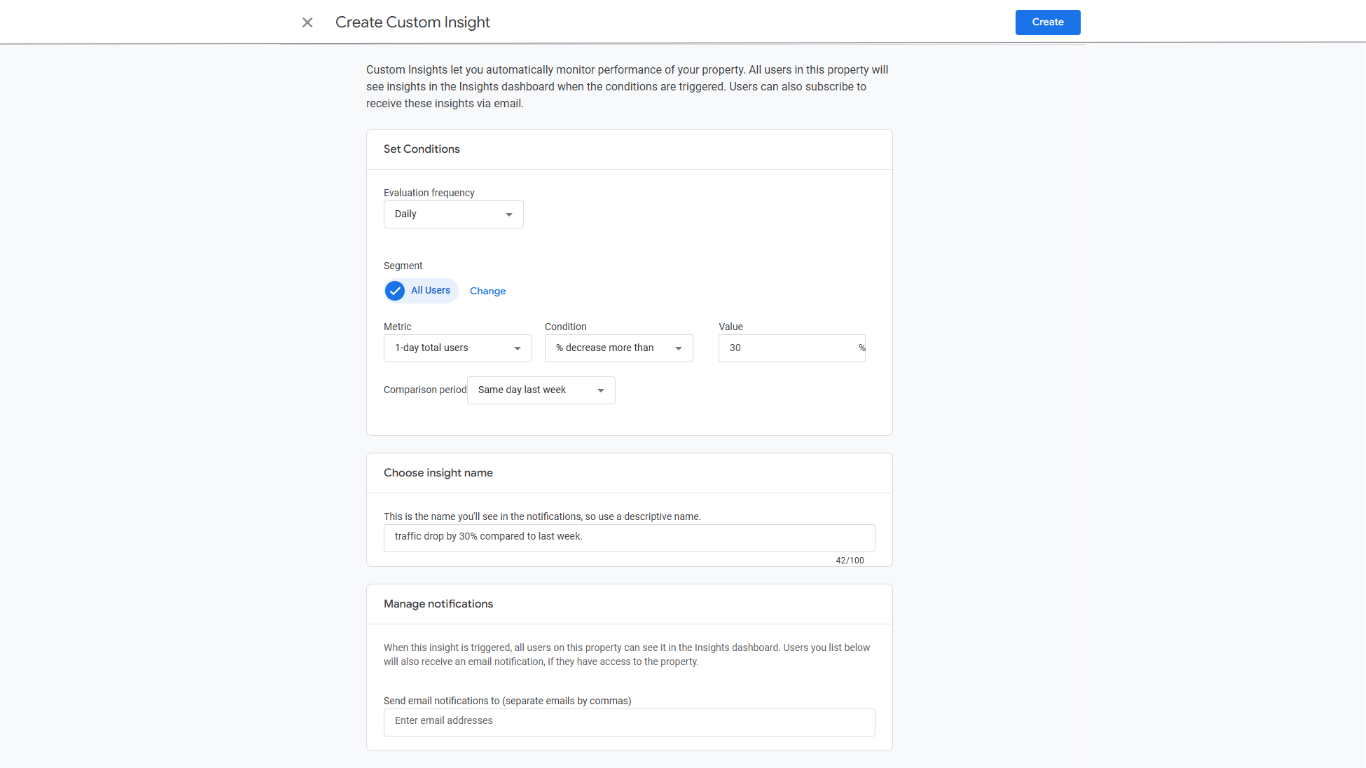
Traffic drop (30% decrease vs same day last week)
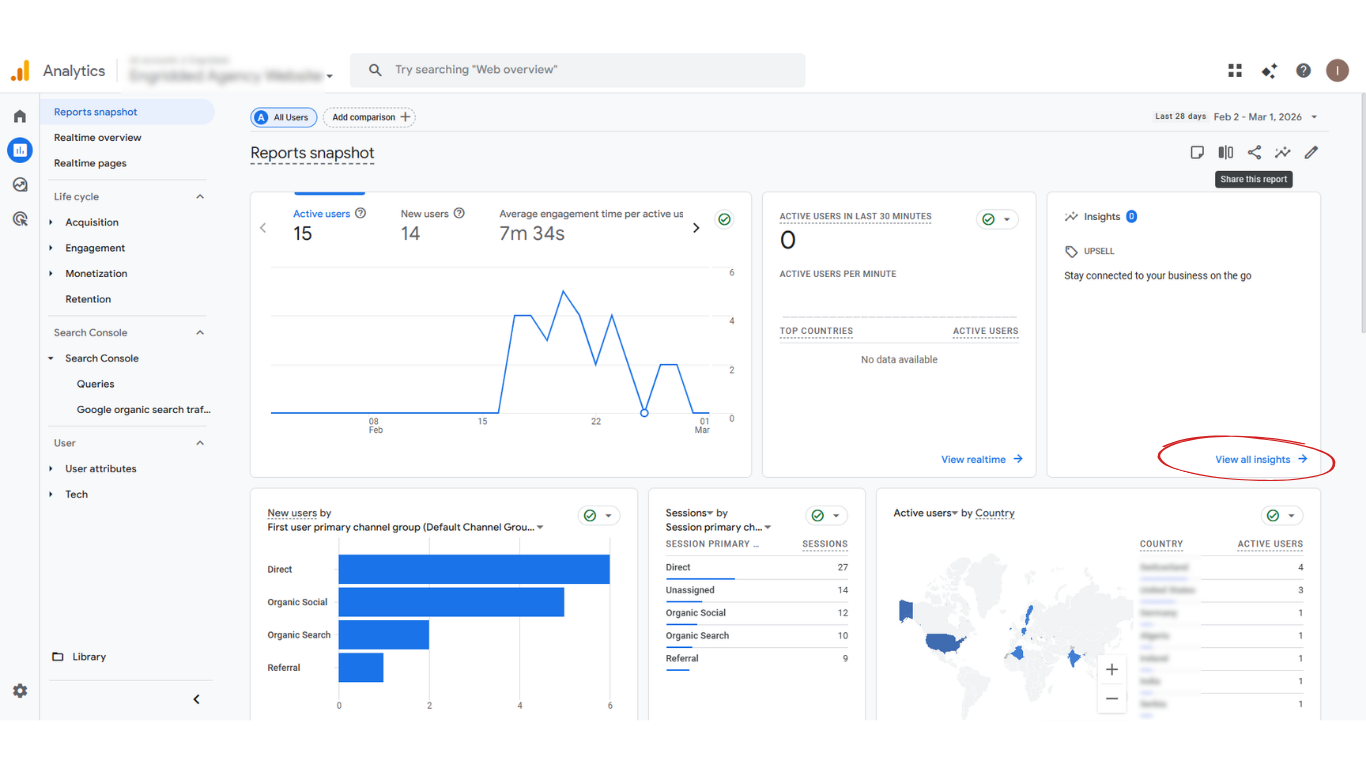
· In GA4, click Reports (left navigation)
· Find Insights
· Click View all insights
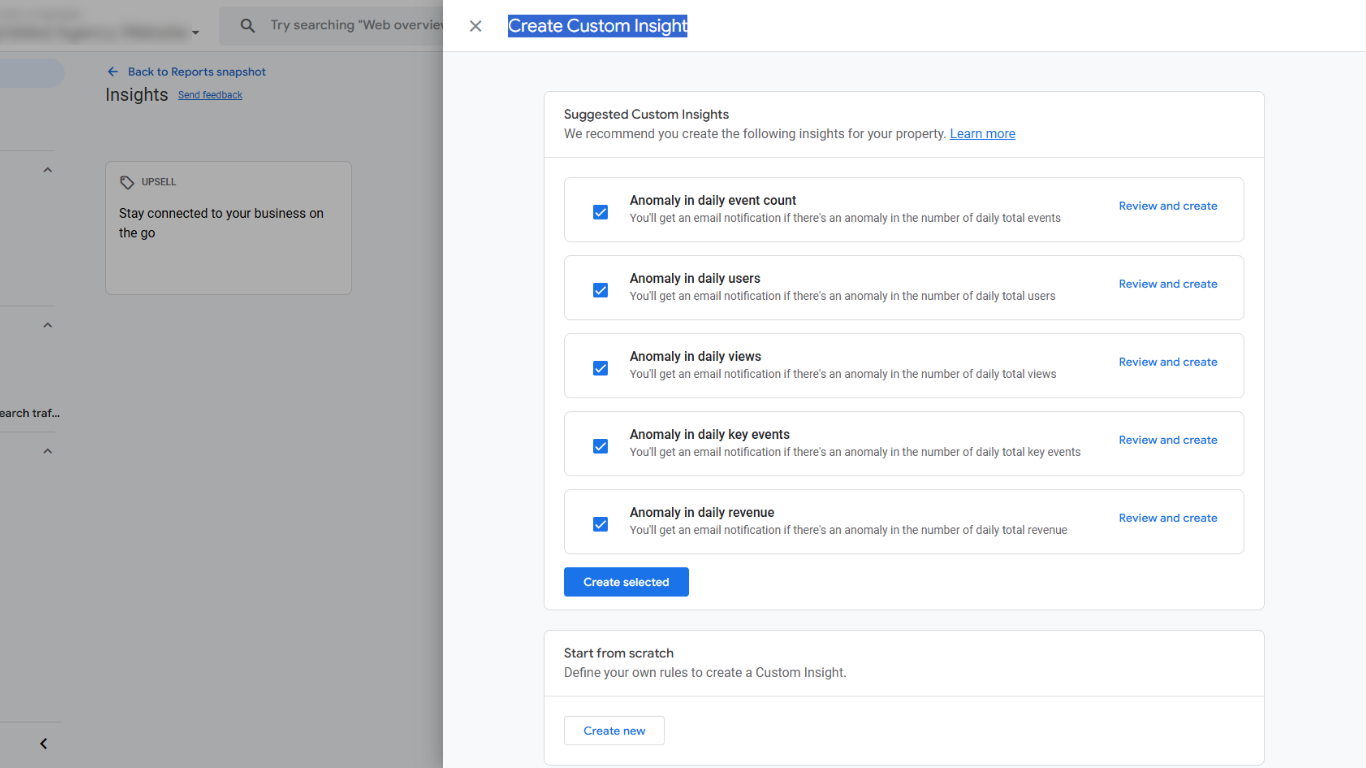
· Click Create
· Find Anomaly in daily users.
· Click Review and create
You’ll now configure the alert using these specific selections:
· How often to evaluate: Daily
(You want this checked every day so you find problems fast.)
· Segment: All users
(This monitors the whole site audience, not a subset.)
· Metric: 1-day total users
(This makes the alert compare “today’s users” to a baseline, instead of weekly/monthly totals.)
· Change Condition from Has anomaly to: Percentage decrease more than
· Set the value to: 30
Why 30%? Early on, swings can happen more often. But once things stabilize, a 30% drop is usually a meaningful red flag.
· Comparison period: Same day last week
This is the key choice. It avoids false alarms caused by normal day-to-day patterns (like weekend vs weekday differences).
· Name: "Traffic drop by 30% compared to last week"
· Confirm the email notification field is your correct email (this is the whole point).
· Click Create
Traffic spike (30% increase vs same day last week)
Now you’ll repeat almost the exact same setup, just flip the condition to an increase.
To start a new alert:
· Go back to View all insights.
· Click Create again.
· Choose Anomaly in daily users → Review and create
Set the same core configuration:
· Evaluate: Daily
· Segment: All users
· Metric: 1-day total users
Set the “spike” condition
· Change Condition to: Percentage increase more than
· Set the value to: 30
· Comparison period: Same day last week
· Name: "Traffic spike by 30% compared to last week"
Verify the email is correct.
· Click Create
Where to see and manage your alerts
After creating them:
Go to the top area where you can access Manage (in the insights area).
You should see both alerts listed, and they should be Active.
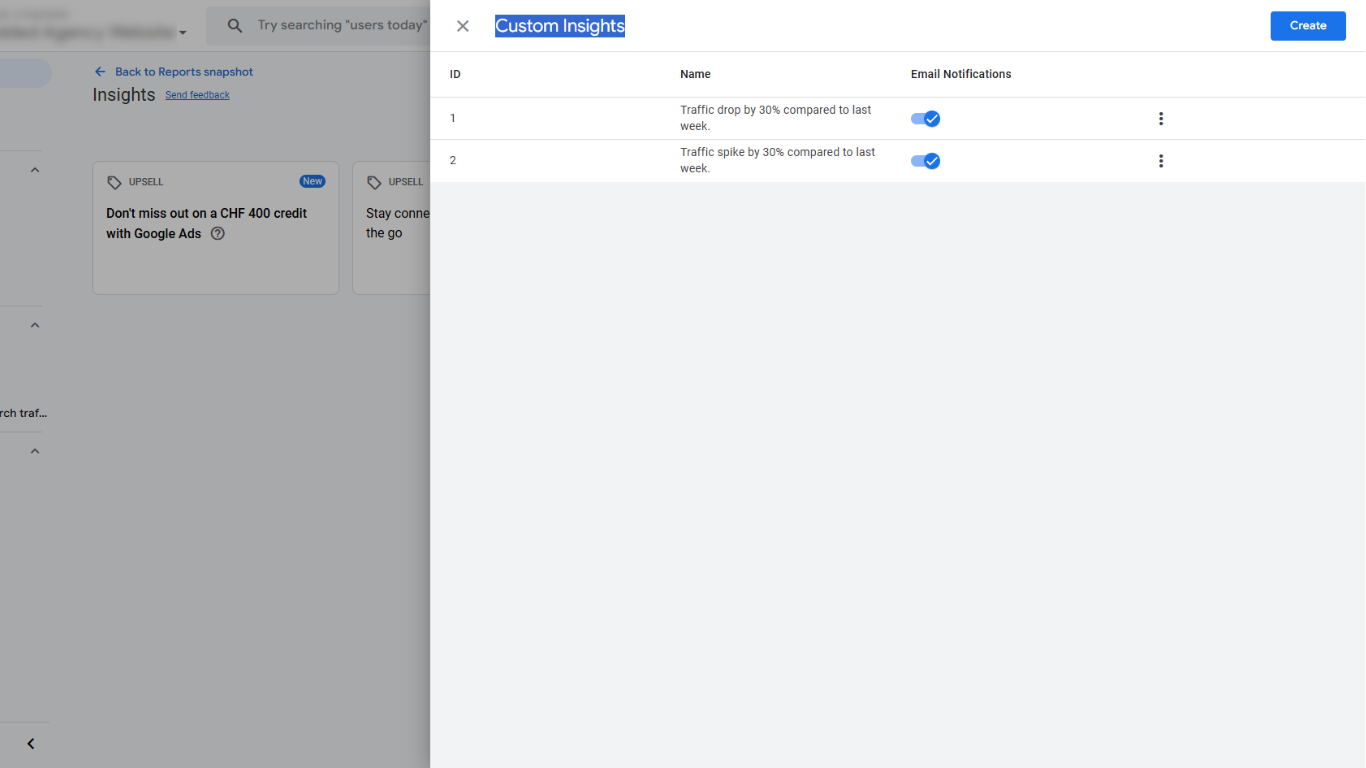
Now you’ll get emailed when:
· Daily users drop hard (potential outage/tracking issue)
· Daily users spike hard (opportunity moment)
This is one of those setup steps that feels small, but it can save you real money (and help you catch lucky breaks) without having to constantly check GA4.
Setting up Google Analytics 4 using Google Tag Manager is not just a technical task, it’s a foundation. When GA4 is installed correctly, connected to Google Search Console, cleaned from internal traffic, and supported with alerts, it becomes something you can actually trust.
You don’t need to track everything. You need to track the right things, with clean data and clear signals. Once this setup is in place, GA4 stops feeling confusing and starts feeling useful. From here, every report, decision, and optimization becomes easier and more confident.


